Configuring a Fuji X-T3 for Bird Photography
As I’ve been feeling more like picking up a camera and taking pictures recently, and with fall migration kicking in, I’ve been working with the Fuji X-T3 again and trying to shake off the rust (with mixed results, complicated by the state burning down, the air becoming unbreathable, and major heat waves driving any sane people back indoors. In other words, 2020).
I’ve also been having conversations with a friend who’s also a Fuji shooter about how I have my camera configured, and it can get a bit complicated to do this in conversations, so I decided to write it down and share it here where it might benefit a wider audience.
The quick answer to “Is the Fuji X-T3 good enough as a bird photography camera?” is “I really love it!” — although I will admit like any camera, you need to spend time practicing and I suggest using this guide to get to know the various configuration options to help you tune its performance.
I will also warn you up front: your mileage will likely vary. Your shooting style is going to be different than mine, and that implies you may well end up preferring different settings than I do because they match your style better. This is not THE ABSOLUTE BEST ULTIMATE SETTINGS, but more an indication of what works best for me and what I think is a good starting point for you to use to learn how to customize the camera and spend time practicing and experimenting to find out what works best for you.
(Digression: a question I get asked a lot is “Should I upgrade to the Fuji X-T4? That’s a complicated thing but “it depends” is a lousy answer, so let me suggest this: If you are a Fuji user and own an X-T3, I see almost no reason to spend money on an X-T4. If you use an X-T2 or before, the upgrade will be more than worth it — but since the X-T3 is also still being sold, is a lot cheaper and a really good value. or consider the little brother X T-30, cheaper still and still more than good enough for almost everything a bird photographer will want to do. A primary reason to think about the X-T4 might be if you need state of the art video as a hybrid shooter, but excluding that, there aren’t any compelling improvements between an X-T3 and an X-T4 to warrant the costs of upgrading).
A couple of resources I’ve found useful:
Fuji has a rather nice version of the X-T3 manual online.
Alaska photographer Dan Bailey has a nice eBook on the Fuji X series cameras that goes into how to configure it in detail. Useful to explore things I’m not covering here or to see a different view of how to set up the camera
Let’s get started
The Fuji X-T3 Menu system
I think I should start with this acknowledgement: modern cameras have many, many (many) configuration options, all handled by a menu system. On the Fuji X-T3, you enter the menu using the Menu/OK button on the back of the camera. Around that button are four round buttons that act as arrow buttons allowing you to move left/right or up/down in the menus. You use the Menu/OK button to select an item, and below this, is a button labelled DISP/BACK which in the menus allows you to step back one level out of a selection, or out of the menus.
Each page can have up to 8 setting items on it. If you start counting up, you’ll quickly realize just how many ways you can tweak this camera. It’s easy to get lost when you get started or intimidated by the complexity. I should note that some of these items, especially in the setup area, have their own sub-menu of items.
The good news is, most of this you are unlikely to ever need to touch or change, and you can ignore most of it until you feel comfortable experimenting with them.
On the left is a sidebar with seven primary categories. Each category will have one or more pages behind it; for instance, Image Quality has three pages of menu settings.
The seven categories are:
Image Quality (3 pages)
Auto Focus/Manual Focus (3 pages)
Shooting (2 pages)
Flash (1 page)
Movie (Video) (5 pages)
Set Up (1 page)
My (0 pages)

Right off the bat, we’re going to pretend the Flash and Movie/Video areas don’t exist, since we aren’t going to be using either feature. You’ll notice the My area is empty, beacuse I’ve never seen the need to use it, personally. This guide will focus on four areas:
Image Quality
Set up
Shooting Settings
Focus
Image Quality
Image Quality (see the image above) is the first and easiest to configure. I recommend setting Image Quality to RAW, which will also set Image Size to RAW. On page 3 of these settings I also change Color Space to Adobe RGB instead of sRGB.
Everything else in this menu area pertains to various tweaks when you’re shooting to JPEG. By shooting RAW, you’re deferring all of those tweaks and decisions to your time in the digital darkroom. I know some people love playing with the various film simulations and other options available here, but my personal preference is to capture the best possible RAW image and do the experimenting and playing in Lightroom.
Set Up
The second section we’ll look at is the Set Up area, which is the last on the menu sidebar. This is where it gets interesting.
Set up consists of seven items:
User Settings
Sound Set-up
Screen Set -up
Button/Dial Settings
Power Management
Save Data Set-up
Connection Settings
Each one has its own menu subsystem, so there’s a lot to unpack here.
User Settings
The User Settings area gives you access to basic functions:
Format: Here is where you format your data cards. I originally was annoyed that it was buried levels deep in the menus, but I realized it was set to be really quick to access: MENU/OK->LEFT->UP->RIGHT>RIGHT and you’re there. It quickly becomes second nature.
Date/Time: Verify and set the time your camera is set to. I usually verify this before every shoot, but I find the clock pretty accurate
Time Difference: You can use this to add a timezone offset to the date/time for when you travel. I never use it, I simply change the clock.
Language: The language the camera speaks to you in
My Menu Settings: This is where you can add items to that final MY menu at the top level. I don’t use it but if you find yourself tweaking certain things constantly, this is how you can surface them to get to them easier (although you can maybe use the quick menus, to be discussed later)
Sensor Cleaning: This is where you can activate the sensor cleaning, and set/disable sensor cleaning on power on or off (or both). I have it set to clean on power off.
Reset: Two options here: Shooting Menu Reset, or Set-up (aka factory) reset. Useful when you do something you hate and can’t figure out how to un-do it.
Sound Set-up
This area lets you set shutter sounds and volumes and audio volumes for playback of video. Configure as you prefer.
Screen Set-up
This area has three menus of things you can do to customize the EVF and the back LCD screen, including brightness, whether and how long to display an image after capture, and framing guidelines. The latter lets you set to the rule of thirds gridlines, HD cropped gridlines, or a 24 line grid.
On the third page is an option you might care about, which is setting the indicator items on the EVF or LCD screen to large or small. I prefer it large.
Button/Dial Settings
Here’s where we hit some of the complicated ways you can customize your camera.


There are three screens here, and the options are:
Focus Lever Setting: The focus lever is the knob/joystick on the back of the camera above the menu button area. It allows you to work with and customize your AF focus points. Options are:
Lock: Disable the button
Push to unlock: my preferred setting. Pushing it will show the focus points on the EVF or LCD and you can use the button as a joystick to move them around. Push it again and the lock in place.
On: the stick is always active — and I find I’m always moving them accidentally, which is why I keep it on Push to Unlock.
Edit/Save Quick Menu: We will discuss this below.
Function (Fn.) Setting: We will discuss this below.
Selector Button Setting: This button defines how the four buttons the circle the MENU/OK button are used. If set to Fn they act as function buttons and can be customized. If set to Focus Area they’re used to move the focus points around, and customizing them is disabled.
Command Dial Setting: We will discuss this below.
ISO Dial Setting (H): If you look at the ISO dial on the top left of the camera, you’ll see it has three letter settings as well as numbers. These menu items let you set what those letters represent. The H allows either 25600 or 51200. I’ve never felt the need to shoot an ISO of 25000, and if you do, I hope you like noise reduction.
ISO Dial Setting (L) the L setting allows ISO 80, 100, or 125. I have this set to 80.
ISO Dial Setting (A) the A setting allows you to set the camera to allow you to set the ISO with the front camera dial, or enable Auto-ISO. Auto-ISO allows the camera to pick an appropriate ISO based on other camera settings. This allows the camera to boost the ISO if needed to keep the exposure in range, but return to a lower ISO when conditions permit. I know people who love this; I have used it at times but in general, I don’t turn it on. The Auto ISO settings are not set here, but instead over in the shooting menu (for some reason)
Shutter AF: Shutter AF sets whether or not the shutter button enables AutoFocus when you press the shutter. It can be set separately for AF-S (single focus) and AF-C (continuous) mode. The default for both is on. I turn both OFF and configure another button to control AF. We’ll discuss that in more detail shortly, but I don’t want my focus searching whenever I hit the shutter button all the time. Most of the time, I’ll fire AF to pre-focus and then lock it down for shooting, but setting them to separate buttons does allow me to turn on AF while shooting when I want to.
Shutter AE: does the same for AutoExposure. The default is on, and I leave it on. Any time I don’t want the AutoExposure system in control I switch the camera to manual exposure.
Shoot without lens: If you shoot non-Fuji, manual lenses, they may not be recognized by the camera body as being attached. This allows you to override that so you can shoot with them.
Shoot without card: This allows you to shoot without a memory card, useful if you are dumping images out of the camera, normally when you are tethered to a computer.
Focus Ring: set whether turning the focus ring on the lens clockwise or counterclockwise extends the focus distance. choose your preference
Focus Ring Operation: changes whether the distance moved is linear or non-linear when you turn the focus ring. Non-linear implies that if you turn the ring faster focus moves faster, where linear is at a standard speed as long as the ring is turning. I typically use non-linear.
AE/AF Lock Mode: On the back of the camera are two buttons, AE-L and AF-L. This option controls whether those capabilities are active while the button is being pressed, or whether the buttons act as an on/off switch for the feature. (and note, these functions can be re-mapped to other buttons or disabled)
AWB-Lock Mode: If you assign a button to control Auto White Balance, this option controls whether it acts like the AE/AF buttons do: On while pressed or on /off switch.
Aperture Ring Setting (A): define whether the camera sets aperture automatically or you set it manually. I’m normally on AUTO.
Aperture Setting: Choose the way to set aperture for lenses without an aperture ring. Most lenses will have one, and this is disabled when those are attached. For those without, you can set this to AUTO, MANUAL, or AUTO+MANUAL. I’m set to the final one.
Touch Screen Setting: Here, well hidden in the menus, is where you turn on and off the touch screen and define it. I normally leave it disabled because while shooting, I got tired of my nose changing my AF points. As I’m starting to shoot more video, I’m thinking I’ll use the touch screen more — at times. Fortunately, I can enable/disable the touch screen on the quick start menu, or I could potentially move this to the MY menu for easier access. It has the following items:
Touch Screen Setting: ON or OFF
Double Tap Setting: ON for double-tap to zoom the LCD screen for close focus. OFF to disable
Touch Function: ON or OFF
Video Touch Screen Setting: whether or not touch is enabled during playback
EVF Touch Screen Area Setting: select the areas of the touch screen enabled to respond to touch events, or disable. The touch screen events are configured elsewhere.
Lock: Allows you to lock or unlock the ability to change selected functions. I never use it.
Edit/Save Quick Menu
Once you start customizing it, you’ll find the Quick Menu really useful. It’s activated by hitting the Q button on the back of the camera, and brings up a mini-menu of 16 possible items. You navigate around using the joystick or the four directional buttons around the menu button.

You can set many of the camera’s functions to be accessible quickly here. There are four screens of menu items to choose from, but many of them are tied to items on that first menu area tweaking JPEG creation that I never use. The first one I find useful is the final item on screen two, AF MODE. There are also various flash and video-related items you can add in. The ones I use are below):
AF Mode
AF-Custom Settings
Face/Eye Detection Setting
MF Assist
Touch Screen Mode
Self-Timer
EVF/LCD Brightness
NONE
This allows you to make them easily available, and we’ll talk about what they do as appropriate elsehwere in this guide.
Function (Fn.) Setting


Now the fun really begins. We get to set different functions to the buttons and dials on the camera.
The following can be configured:
FN1: This is the button (labeled Fn) on top oc the camera on the right side between the exposure dial and the exposure compensation dial
FN2: This is the unlabeled button on the front of the camera to the right of the lens
FN3: This is the top button in the circle of button’s surrounding the MENU/OK Button
FN4: This is the left button in the circle of button’s surrounding the MENU/OK Button
FN5: This is the right button in the circle of button’s surrounding the MENU/OK Button
FN6: This is the bottom button in the circle of button’s surrounding the MENU/OK Button
T-Fn1: This is the function you define for a swipe up on the touch screen
T-Fn2: This is the function you define for a swipe left on the touch screen
T-Fn3: This is the function you define for a swipe right on the touch screen
T-Fn4: This is the function you define for a swipe down on the touch screen
AE-L: The AE-L button on the back of the camera
AF-L: The AF-L button on the back of the camera
R-Dial: This is the function you assign to pressing the dial on the back of the camera between the AE-L and AF-L buttons
MOST (but not all) of the features you can set in the menus can be attached to a button for quick access. Between this and the quick menu, you can almost always configure the camera to let you get to the things you need to in a hurry — which is one reason I’ve never populated things into the MY menu.
The one thing I will strongly recommend to everyone to try is to set FN2 to AF-ON. Since we have turned off AF on the shutter, we need a way to control it. Canon users talk a lot about back-button focus and I used it extensively before switching to Fuji. When I did, I initially set up back button focus using the AF-L button, but I find it uncomfortable to use the way I grip the camera, where it feels quite natural to set it onto FN2 and control the shutter with my index finger and AF with my middle finger. For me, it just works. Try it both ways and see which way feels better for you. I find I can even control both while holding the camera one-handed, where hitting the AF-L button with my thumb is problematic.
Beyond that? Experiment. Play. See which features make sense for how you shoot. It’s really personal and it’s easy to try and change things. Here are the things I normally configure and what I depend on:
FN1: Depth of Field Preview
FN2: AF-ON
FN3: Enable/Disable self-timer mode
FN4: Histogram ON/OFF
FN5: Electronic Level ON/OFF
FN6: IS Mode — enable/disable Image Stabilization
AF-L: AF-ON
AE-L: Focus Check — zoom/unzoom the screen for close focus checking
If moving from using the camera defaults and taking what it gives you to learning how to configure and tweak the camera to give you the image you want is the first step in maximizing the quality of your images, then the second step is learning how to set up the buttons to get access to those customizations on the fly without having to stop and navigate the menus. It’s well worth spending time trying things until you get to the point where you can more or less tweak everything you need on the fly without ever having to stop looking at the scene you’re composing.
Command Dial Setting
This controls the two command dials on the camera, one on the front under the shutter, and one on the back between the AF-L and AE-L buttons. You can set the following options:
FRONT COMMAND DIAL 1/FRONT COMMAND DIAL 2/FRONT COMMAND DIAL 3: There are three separate settings you can make for the front command dial based on other settings or what equipment is attached to the camera. If you can keep this straight, bless you. I’ve set all three settings to Aperture, meaning if the lens doesn’t have its own aperture ring, I can control aperture from the front dial.
FRONT COMMAND DIAL 4: I set this to Exposure Compensation. Other options include Aperture, ISO and Program Shift.
Power Management
Hey, we’re done with the buttons and dials!
Power management is simple: there’s an option to tell the camera how long to stay turned on before going to sleep; I set mine for 5 minutes. There is also an option for performance, which can be set to Normal or Boost. Boost speeds up internal processing, and sets the viewfinder framerate from 60fps to 100fps, and the cost of eating your batteries faster. The X-T3 is not great with batteries, so I am always set to Normal.
Save Data Set-up
This is where you can adjust how data is saved to your card. There are two options you might care about:
FRAME NO: whether to use continuous numbering or reset back to 1 whenever you format a data card or insert a new one. I’m always set to Continuous.
Copyright Info: You can have the camera embed author and copyright info into each image in the metadata. I don’t do this.
Connection Settings
This is where you control the wireless networking in the camera — the bluetooth and WIFI settings. I am not covering that in this guide, and rarely use it.
And that’s it for the user settings. See? easy peasy!
And now, onward to the Shooting Settings area.
Shooting Settings
The shooting settings area controls the various aspects of shutter operation. it contains the following items:

Drive Settings: This controls many aspects of shutter operation. It has four options:
BKT Settings: Choose and configure your bracketing options. Most cameras allow for some kind of exposure bracketing, which is how HDR photography is created. the X-T3 also allows bracketing of your ISO, Film Simulations, White balance, Dynamic Range and Focus Bracketing. These days I use AE bracketing occcasionaly and Focus Bracketing (aka Focus Stacking) at times.
BKT Select: Choose the specific Bracketing operation from AE, ISO, Film Simulation, White Balance, Dynamic Range or Focus
AE BKT: Configure AutoExposure bracketing. This allows you to set how many images to bracket (I usually use 3, sometimes 5), the sequence they are taken in (I typically use 0, +1, -1) and whether to take one frame or the entire bracket sequence on a shutter click (I use Continuous)
ISO BKT lets you shift ISO between images in 1/3, 2/3 or 1 stop increments
Film Simulation BKT lets you pick three film simulations and bracket an image with them. Not useful for RAW shooters
White Balance BKT: lets you adjust white balance by various increments in a bracket. If you shoot Auto White Balance, not useful.
Focus Bracket (aka Focus Stacking): lets you to define a stack of image (up to 999 images), a focus adjustment, and a shooting interval. When you set it off, it will take the defined number of images, changing focus by the adjustment between images, and waiting between images the interval you define (if any). focus stacking allows you to blend multiple images into a very wide depth of field master the way AE bracketing allows you to use HDR software to do high dynamic range photography. While discussing this is out of scope of this article, I have written about it. You can see more details in Focus Stacking with the Fuji X-T3 and learn more about focus stacking software in Focus Stacking: Helicon Focus vs Photoshop.
Sports Finder Mode: This basically allows you to look outside the frame to see action that may be coming into view. It has some restrictions and includes a 1.9 crop. I don’t find it that useful, but it’s worth experimenting with to see if you like it.
Pre-ShotES: Pre-ShotES is an action photography capability that basically sets up the camera to be monitoring and saving what is happening before you press the shutter, to help close the gap in the lag between you deciding to shoot and the shutter activating. In a way, it’s like the iPhone Live Image that captures a buffer of images and then selects one once you actually press the shutter. Half-press the shutter to activate it, full press to capture. It requires use of the electric shutter. I’ve never used this but I’ve considered experimenting with it. Dan Bailey has a good piece on what it does and how to use it.
Self-Timer: allows you to enable/disable the self timer and set the delay to 2 or 10 seconds. When enabled, pressing the shutter starts the timer and delays activating the shutter for that period of time. The original idea was to enable someone to run into the frame for a selfie — but landscape photographers use it as an alternative to a cable release as well.
Interval Timer Shooting: This is your basic timelapse intervalometer. You can set the interval between images and how many images in the timelapse. It can save you from needing to buy or carry an external intervalometer if your needs are basic.
Shutter Type: Let’s you set which shutter you want to use. The options:
MS: The traditional Mechanical Shutter. Works to 1/8000 of a second.
ES: The Electronic Shutter. This works to 1/32000 of a second and allows for silent operation. There can be challenges caused by this operation, which is why it’s not the universal choice. Jim Pelletier has a good overview of the pros and cons of ES. In general there may be image distortions when using electronic shutter with action images because of the time lags involved in scanning the data in the sensor.
E-Front: Electronic Front Curtain Shutter. This merges the ES and MS systems together to reduce shutter vibration to get sharper images. Basically, the shutter is opened but light capture isn’t enabled, and then the ES is enabled to start the image and MS is used to end the exposure. It works to 1/8000 of an image. It can have some issues with action photography. Photography Life has a nice overview of it.
M+E: MS plus ES: The camera will use MS up to /8000 then automatically shift to ES for higher speeds. this is my usual setting.
E-Front + MS + ES: The camera switches between E-Front, MS and ES shutters based on operating situations.
Flicker reduction: Reduces flicker in images when shot under fluorescent and similar lighting. I never use this.
IS mode: You can set Image Stabilization to Continuous, Shooting Only or Off. If your lens has no built in IS, this is disabled. In general, I set this to Shooting Only, because Continuous will use more battery due to the constant operation, but the tradeoff is a slight lag as it becomes fully operational that might affect the first image in a burst.
ISO Auto Setting: Here is where you set the configurations for up to three presets to use with Auto-ISO. Each one lets you define a default ISO (I typically use 160), a maximum (I typically use 12800 because above that image noise because a big issue), and a minimum acceptable shutter speed (which can be from 1/500 to 1/40, or Auto). I typically use Auto. Auto-ISO will attempt to lower the ISO as much as possible until it reaches your default ISO to keep the shutter speed above your minimum acceptable. The goal here is to minimize noise by not setting too high of an ISO unless it’s really needed. I typically don’t enable this, but I know many photographers who swear by it.
Mount Adaptor Setting: This allows you to set various configurations if you find yourself using Manual M-mount lenses. I never use this.
Wireless Communication: This is where you connect to your smartphone app over wireless networks. Note this is configured over in the User settings area.
AF/MF Settings
Finally, the most interesting and most complicated part of the camera: the AutoFocus system. This is the most complicated aspect of the camera, but the part of the camera where learning what and when to tweak can lead to the biggest improvements in getting the image you want (instead of the image the camera feels like giving you). That said, what I’ve done is find the things that seem to work best for me and narrow things down to only using those pieces while ignoring the rest.
It’s easy to get lost in the various settings and options, and feel intimidated by the complexity. My recommendation: schedule practice time and simulate your shooting conditions as you can and try different things. I keep a log of the different settings and image numbers when I go out on test shoots, and bring it back, load it into Lightroom and evaluate the results to see which settings get me the right results with higher accuracy and which don’t.
Since we all shoot differently, I’m going to suggest we will all feel slightly differently about what the best settings are. What I’m going to do here is describe the various settings, and then I’ll follow it up with my preferred settings and under which circumstances I use them.
At it’s basics, the X-T3 has three focus options. Which option is active is selected by a switch on the front of the camera:
Manual Focus: The camera leaves focus up to you, but offers various focus aids you can use if you want
Continuous AutoFocus: The camera will constantly monitor focus and adjust itself as long as you have AF enabled
One-Shot AutoFocus: The camera will use AF to set a focus point and then turn AF off
The AF system uses a set of focus points spread across the sensor area. Depending on how you configure things, it will use as few as a single point or as many as 425.
All of these have use in bird photography, and use each under different circumstances.
Fuji X-T3 AF/MF Menu settings

These are the settings in the AF/MF area with a description of what they do:
Focus Area: displays the current set of active focus points. This acts the same as punching the focus lever.
AF Mode: Disabled in Manual Focus (MF). In Single Shot or Continuous, there are four options:
Single Point: This defines a single focus point which is used to determine focus. This point uses a very small part of the image to determine what to focus on. This point can be adjusted from a single focus point to a 3x3 box of points. This point can be moved around the screen by the focus lever or the four circle buttons on the back of the camera, depending on how you have things configured. When the Focus Area is active, it shows up as a green box on the screen.
Zone: This defines a small part of the image to use for determining focus. This area can be from 3x3 focus points to 9x9. This area can be moved around the screen by the focus lever or the four circle buttons on the back of the camera, depending on how you have things configured. When the Focus Area is active, it shows up as a green box on the screen.
Wide/Tracking: When set, the viewscreeen will show a series of boxes overlaying the sensor. When AF is enabled, the camera will focus, and the boxes used to determing point of focus will be set to green.
All: This allows you to cycle between the three options using the scroll wheel on the back of the camera.
AF-C Custom Settings: This allows you to tweak some of the settings of the AF system to modify how it decides what to set focus on. We’ll talk about this below.
Store AF Mode by Orientation: If you want different settings for portrait vs landscape orientation, enable this. I don’t.
AF Point Display: Turn this on so you see the focus points overlaid on the sensor on your screen. I always have this on.
Number of Focus Points: Used only in Single Point mode, you can define whether you want to enable 117 points (9x13) or 425 points (17/25). I always have this set to 117. It is disabled with the other options.
Pre-AF: if enabled, AF will track even if you haven’t half-pressed the shutter. It will also drain your battery faster. Not used if you set AF to another button. I always leave this disabled.
AF Illuminator: use an AF illuminator light on the front of the camera to improve AF. I always leave this off.
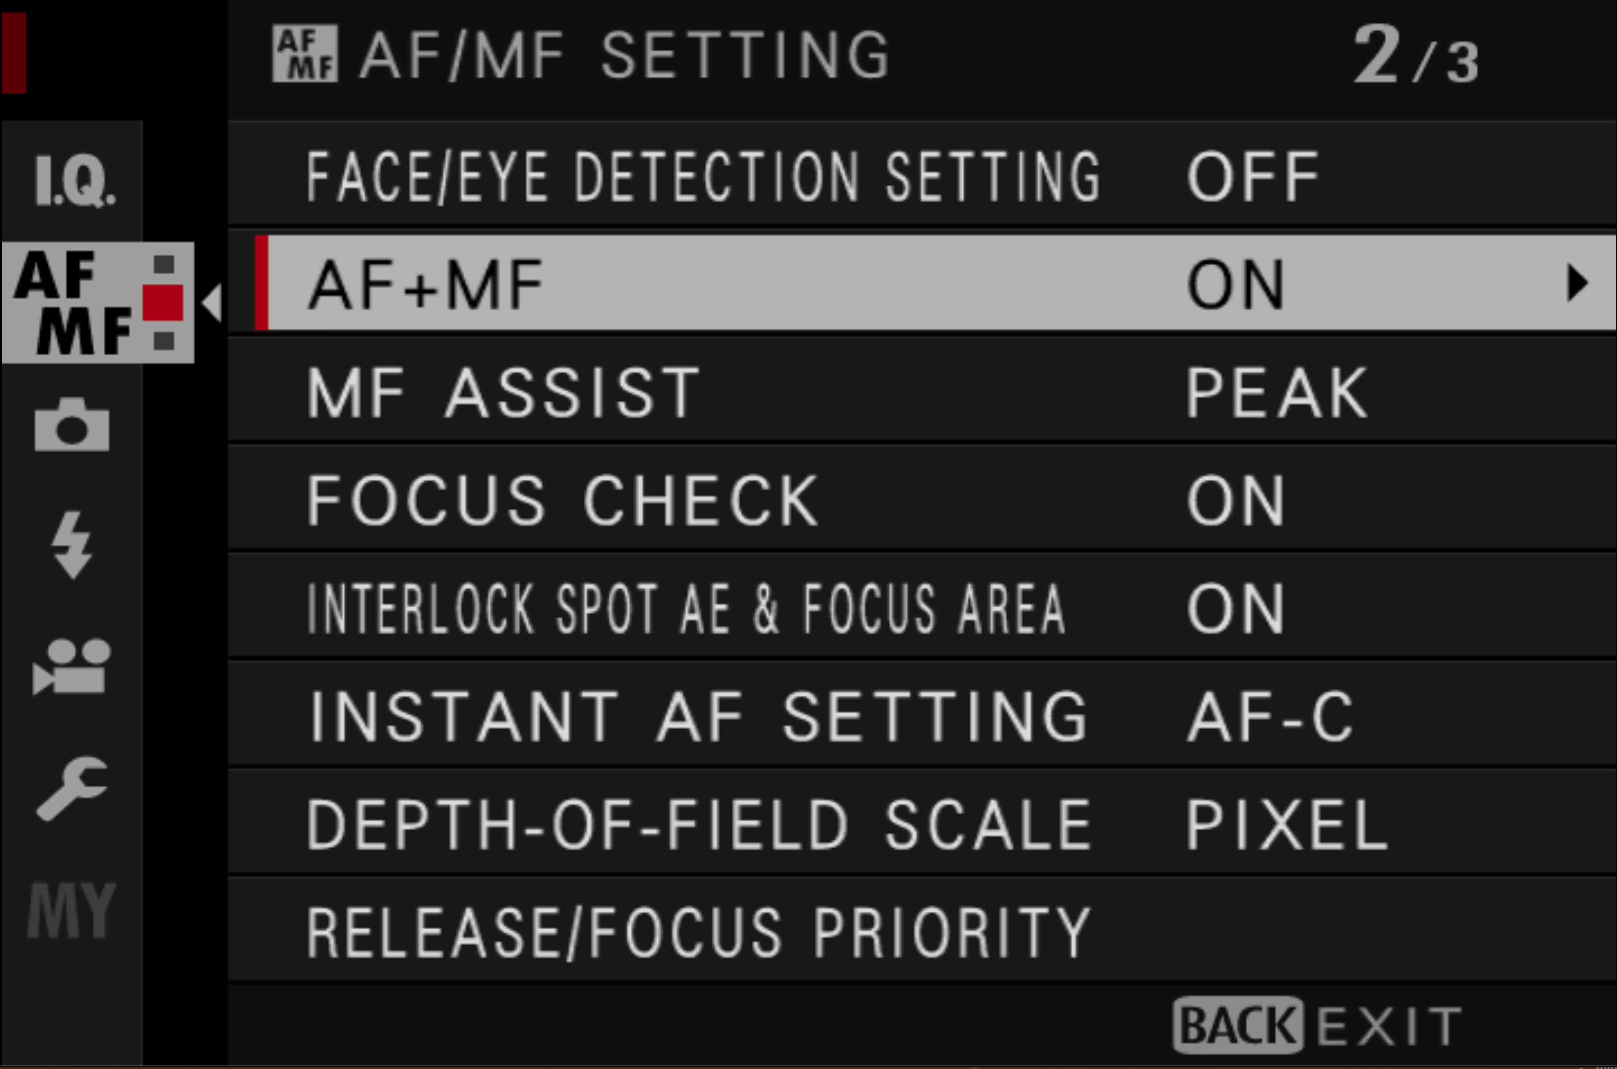
Face/Eye Detection Setting: Turn ON/OFF Face Detection and configure it. My testing indicates it doesn’t work well on non-human subjects (like birds), so I leave this off. When ON, you have these options:
EYE OFF: Face detection only
EYE Auto: camera chooses which eye to focus on
Right Eye Priority
Left Eye Priority
AF+MF: If you turn this on, you can supplement Single Point focus mode with manual focus to fine-tune the focus. Does nothing for Continuous or Manual focus modes.
MF Assist: enable focusing tools for Manual focus. Options are:
Standard: a standard display with no focus tools visible.
Digital Split Images (in either Manual or Color): Displays the image in the center of the frame, split into parts. The alignment of the parts indicate how in focus they are. Simulates a common focusing tool used in traditional film cameras.
Digital Microprism: uses a grid pattern that blurs the image in out of focus areas. Simulates a common focusing tool used in traditional film cameras.
Focus Peak Highlight (in Red, Blue, Yellow or White). I use Focus Peak in Red (HIGH), where HIGH sets the peaking level.
Focus Check: when enabled, the screen will zoom into the focus area when the manual focus ring is turned. I leave this on.
Interlock Post AE and Focus Area: When enabled and in Single Point mode and Spot mode for exposure evaluation, the camera uses the focus point as the point used for setting exposure as well. I leave this on.
Instant AF Setting: Determines whether you use AF-S or AF-C if you are in Manual focus mode and you press the AF-ON button. This is effectively the reverse of the AF+MF option, and it’s one I use a lot. I set this to AF-S.
Depth of Field Scale: defines how the Depth of Field Scale (if enabled onto the screen) is displayed. Options are PIXEL or FILM FORMAT. I use Pixel.
Release/Focus Priority: you can tell the system to prioritize shutter release or focus lock. Setting to Shutter Release may mean some images will be out of focus. Setting on Focus Lock means there may be lag before shooting begins. Either way may cause images to be lost, but working in burst mode generally mitigates this and limits it to the first few images in a burst.
Touch Screen Mode: they hid more touch screen options here, too. You can set whether tapping the screen sets AF focus point to the tough point, to release the shutter or disable.


AF-C Custom Settings
AF-C Custom Settings allow you to tweak how the AF system makes its choices. There are five pre-set options and you can define a custom set as a sixth. Each option can tweak three aspects of the AF system evaluations:
Tracking Sensitivity (values 0-4, zero fastest, 4 slowest): determines how long the camera waits to switch focus when a new object enters the focus area. the higher the value, the longer the camera sticks to the original subject.
Speed Tracking Sensitivity (values 0-4, zero fastest, 4 slowest): how sensitive the camera is to changes in subject velocity.
Zone Area Switching
CENTER: assigns priority t a subject in the center of the focus zone
AUTO: once the camera locks focus on a subject it will shift focus zones to continue tracking that subject as it moves
FRONT: assigns priority to whatever is closest the the camera in the focus zone
The five predefined settings for AF-C are:
Multi-Purpose: a good all around setting and the default for the camera; settings are 2, 0, AUTO
Ignore Obstacles: attempts to hold focus lock on the original subject; settings are 3, 0, CENTER
Accelerating/Decelerating Subjects: Attempts to compenstate for sudden acceleration and deceleration; settings are 2, 2, AUTO
Suddenly Appearing: Attempts to focus quickly on a subject entering the focus zone; settings are 0, 1 FRONT
Erratic Subjects: Hard to track subjects prone to changes in velocity and large sudden movements; settings are 3, 2, AUTO
This can be tough to grasp your head around. I suggest using Multi-Purpose until you spend time testing the others and seeing how they work for you. I use Ignore Obstacles if I’m trying to shoot moving birds or wildlife where there are trees or brush in front of it so the camera will stay locked on the animal. Suddenly Appearing can be useful for pre-composing an image and waiting for an animal or bird to enter from one side or the other. And if you’re struggling with keeping a flying bird in focus, try Erratic Subjects and see if it works better for you — sometimes it does, sometimes not.
How I configure my Fuji X-T3
Here are the important configuration items for how I set my camera:
Image Quality Settings
Image Size/Image Quality: RAW
AF/MF Settings
General
Store Mode by Orientation: OFF
AF Point Display: ON
Pre-AF: OFF
AF Illuminator: OFF
AF+MF: ON
MF Assist: PEAK (RED, High)
Focus Check: ON
Interlock Spot AE & Focus Area: ON
Instant AF Setting: AF-S
Depth of Field Scale: PIXEL
Release/Focus Priority
AF-S Priority: RELEASE
AF-C Priority: FOCUS
Touch Screen Mode: OFF
Manual Focus (MF)
no changes
Single Shot (AF-S)
AF Mode: Single Point
AF-C Custom Setting: Custom (1, 2, Auto)
Continuous (AF-C)
AF Mode: ZONE
AF-C custom Setting: Custom (1, 2, Auto)
Shooting Settings
Drive Settings:
BKT Select (AE BKT; 5, Continuous (0 + -)
CH High Speed Burst: 8FPS
CL Low Speed Burst: 4FPS (my normal shooting default)
Shutter Type: M+E
Those are the key settings for me.
In the field, in practice, I’m almost always shooting in Aperture mode, usually at ISO 800 or above. I use exposure bracketing a lot and often, unless I’m shooting white birds, at +2/3 of a stop. for birds and wildlife I’ll use manual mode, but rarely — I do use it more for landscapes and other kinds of shooting. I never use shutter priority.
I shift between focus modes a lot. My default is Manual, and using AE to set an initial focus and manually tweak if needed. If I have a lot of birds moving around, I’ll switch to AF-C and a wider focus field. I’m I’m trying to focus on birds in clutter (up in a tree surrounded by branches, say) I’ll try AF-S.
I’ll most often use my custom AF-C Custom setting, but there are three others I use as well.
I move around the focus area a lot, and do a lot of tweaking of the size between point and zone. I rarely seem to use the wide field, because the kind of shooting I do rarely seems to use it well. That said — there are times when it’s just what I need. This is why I keep suggesting a need to go out and practice and learn which options work best n what situations. Even though I know “it depends” is a frustrating answer. but practice helps a lot.
I am almost always in slow burst. I’ve set it to 6FPS because higher settings don’t get me more keeper images, just more images to evaluate and cull. Same reason why I rarely use high speed burst. It’s a waste of shutter life and more importantly, battery life, 99% of the time.
One thing note mentioned elsewhere is how I configure the exposure system. This is done by a single control, which is a ring underneath the shutter speed button on top of the camera. It has four metering modes available:
Spot: it meters a specific spot and sets exposure based on that. If Interlock Post AE and Focus Area is set ON and you’re in point focus mode, the point focus area will be used, otherwise it’s a small area in the center of the frame. This can be really handy if you have something like a white bird in shade.
Center-weighted: meters the entire scene but prioritizes the center of the image. I’ve rarely found this to give me a better exposure than Multi.
Multi: This evaluates the image for multiple things like color and composition, what’s in focus, etc, and chooses the areas to use for exposure determination from that. This is a good, solid default setting that I use most of the time.
Average: The camera averages the exposure of the entire frame. I find this is rarely what I want.
And that pretty much covers it, I think.
Let me know if you have questions or ideas on how I can improve this piece (or my settings).\